Qualified Viewer Pool Overview
What is a Viewer Pool?
What is a Viewer Pool?
A Qualified Viewer Pool is built up over the course of your campaign, which can be used for retargeting in later campaigns.
A Qualified Viewer is someone who completes 96% of an ad on CTV and falls within your target demo.
How can I view my Viewer Pool data?
- 1Click on the Viewer Pool tab
- 2Select a User Pool from the Viewer Pool Dropdown. Within our platform, Viewer Pools are isolated by the Ad Groups we assign to them
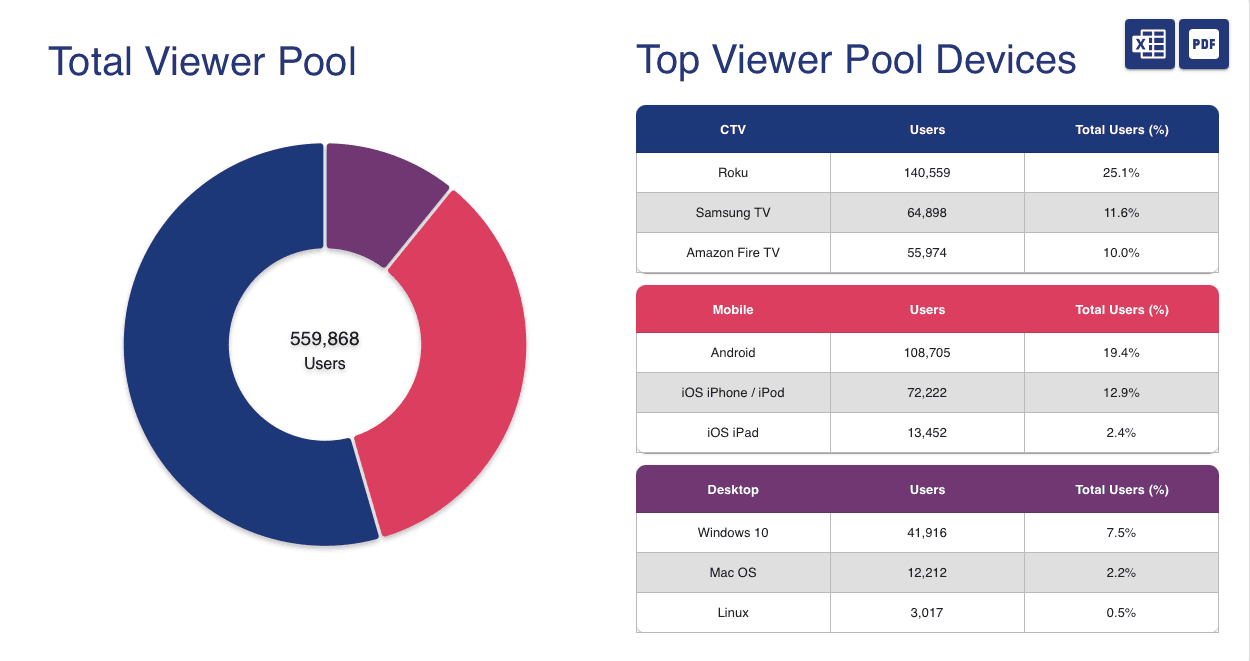
- 3Three widgets will populate: Total Viewer Pool by Screen type (CTV/Desktop/Mobile), Viewer Pool by Device, Viewer Pool by Publisher
- 4You have the ability to download raw Viewer Pool data in either a .csv or .pdf format. This feature can be found in the top right corner of the Devices and Publisher widgets
- 5Once saved in our platform, you will have continuous access to this pool for utilization in future campaigns
How to Create a User Pool
- 1Go to Audience Builder
- 2Click on the QVP Tab
- 3Click "Create New QVP Group"
- 4Enter a name for this group, then click Save. Note: If you have existing QVP data that you would like to combine into this group, then select them from the drop down. Next, you'll need to choose one or more ad groups to begin adding data to this QVP group. This can be accomplished in the ad group level of the campaign editor.
See "How to assign a QVP Group" below in order to start the flow of data.
How to assign a QVP Group
- 1Go to Campaign Manager
- 2Click Edit on any existing campaign
- 3Click on any existing ad group then scroll to the "Qualified Viewer Pool" section
- 4Select your QVP Group from the dropdown.
How to use your QVP for retargeting
Before you can retarget using your QVP Group, you will need to convert it into a saved audience. To do this:
- 1Navigate to the Audience Builder on the left panel
- 2Navigate to QVP located under the search bar
- 3Check the box of one or more QVP Groups you'd like to retarget
- 4Click Save to My Audiences
- 5Locate the Audience Targeting component, and select the new audience from the dropdown menu
- 6Click Save
Next, you will need to add this saved audience to your Ad group's audience targeting. To do this,
- 1Go to the Campaign Manager and click Edit on any campaign
- 2Click on any ad group and scroll down to the audience targeting component
- 3Click the dropdown and select your one or more saved audiences
- 4Save and publish the Ad group.

Built for performance marketers, BlockVantage steers every step of your programmatic workflow — from launch to optimization — in just a few clicks.
Get Started Free